
Saturday, September 14, 2013
Braided Pompadour


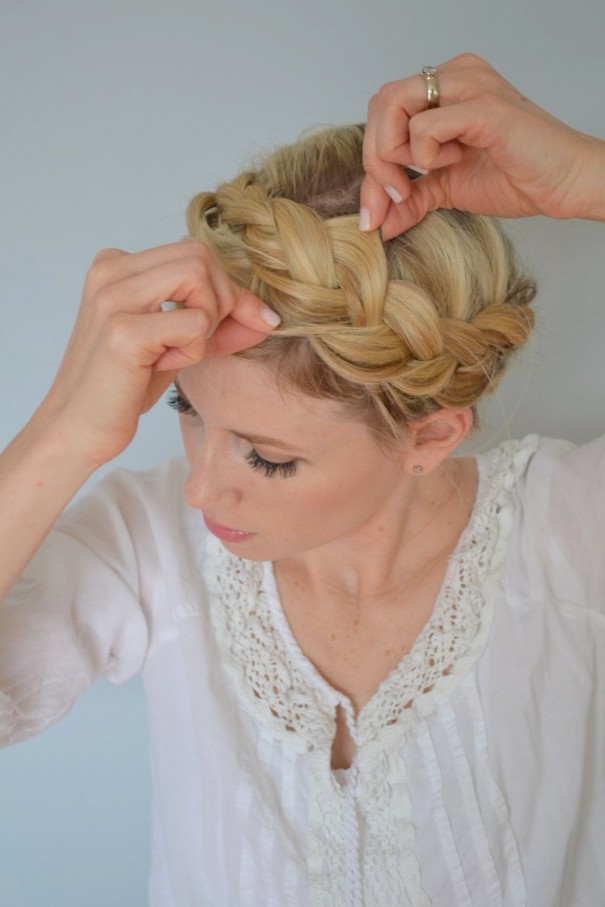
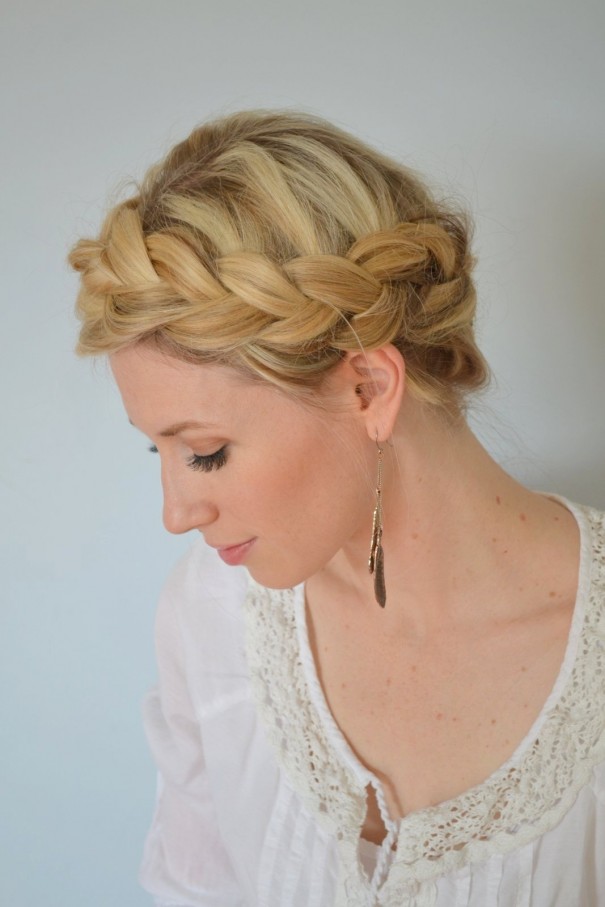
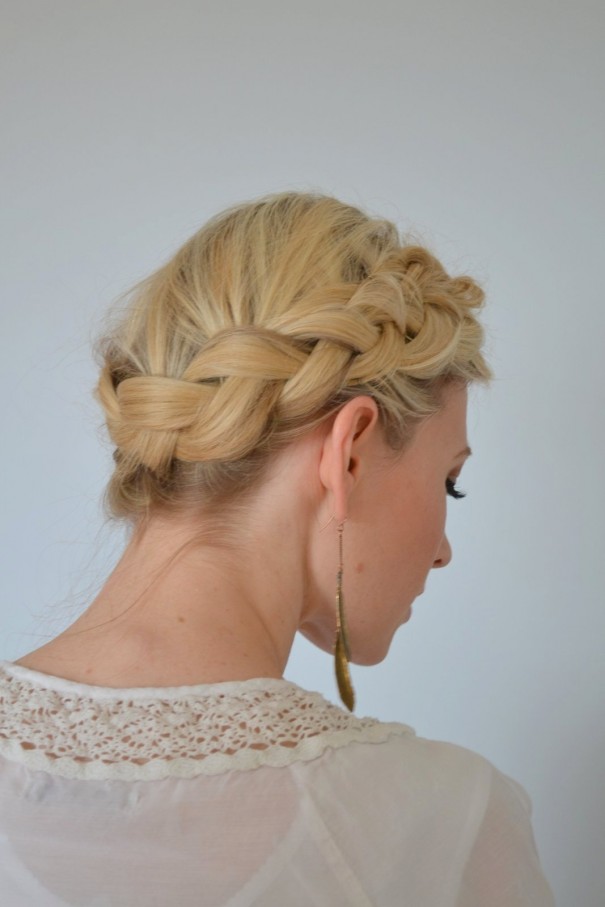
This is one of my favorite "mom" hairstyles. It takes a couple of minutes and keeps your hair out of your face. The shape of the hairstyle is really pretty and flattering. It's a great "I need to wash my hair but just don't have the time" hairstyle.
I couldn't get to a tutorial, so hopefully this makes sense enough. You're going rat/tease where the french braid is. As you french braid your hair back, keep the hair loose. You want a nice round-ish shape to the braided pompadour. You can either take the braid all the way back so that it meets up with your pony tail, or you can section it off with a few bobby pins. I didn't incorporate the braid into my ponytail because the shape didn't look as pretty on me. I then combed the sides and pulled the rest of my hair into a tight bun. I can wrap an elastic around my ponytail three times. For this look I wrapped the elastic around twice and on the third time I didn't pull my hair all the way through the elastic. Then I just messed around with the bun and added a few bobby pins to get the shape I wanted. If your hair is a little bit thin, or fine you can put your hair into a ponytail and then rat/tease the tail. Then either take the ponytail out and do it again, making the bun, or you can add another elastic. That will give you some more volume to work with. Or if you prefer you can ditch the bun and just leave your hair in a straight ponytail!
Enjoy!
Fishtail Up-Do. Who'd have thought!
I saw the cutest fishtail up-do the other day browsing the web.
Thought I'd share. These images are not my own. They come from teenvogue.


Thought I'd share. These images are not my own. They come from teenvogue.


Pretty huh?! I'm going to have to try this soon. It looks a little confusing to me but the instructions seem simple enough. And you never know how hard something is until you try it. Life has taught me that it's usually not as hard as it looks. Or it is and then it sucks!
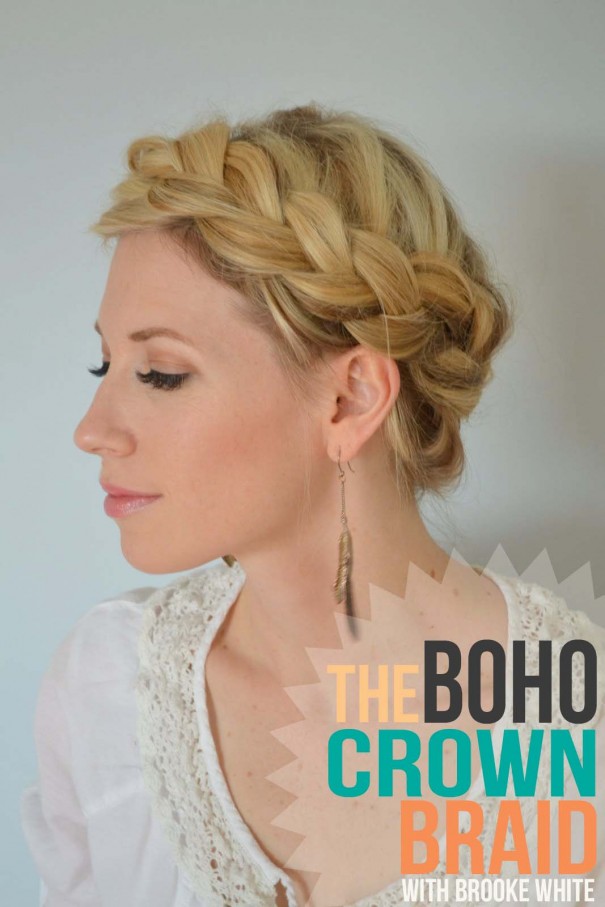
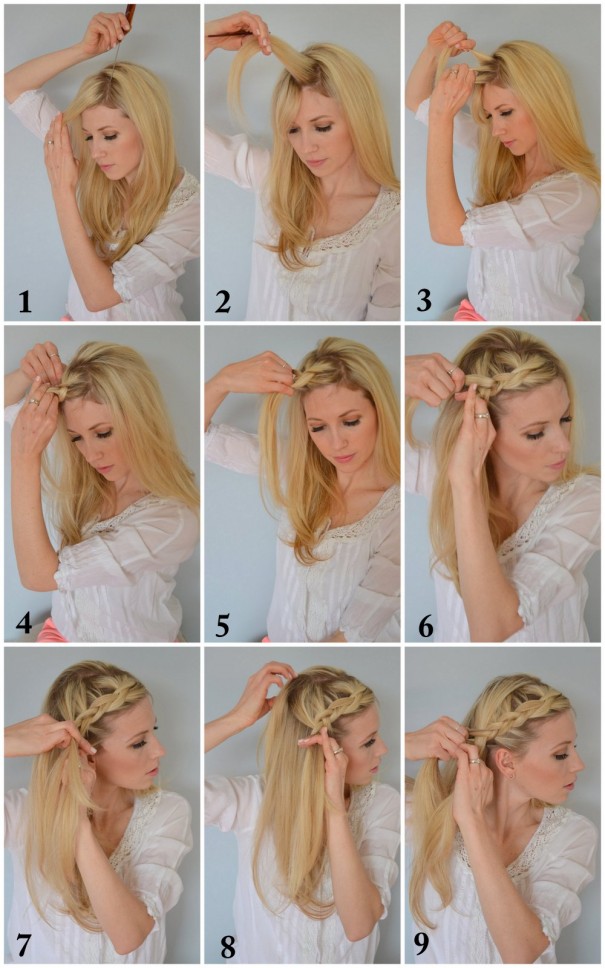
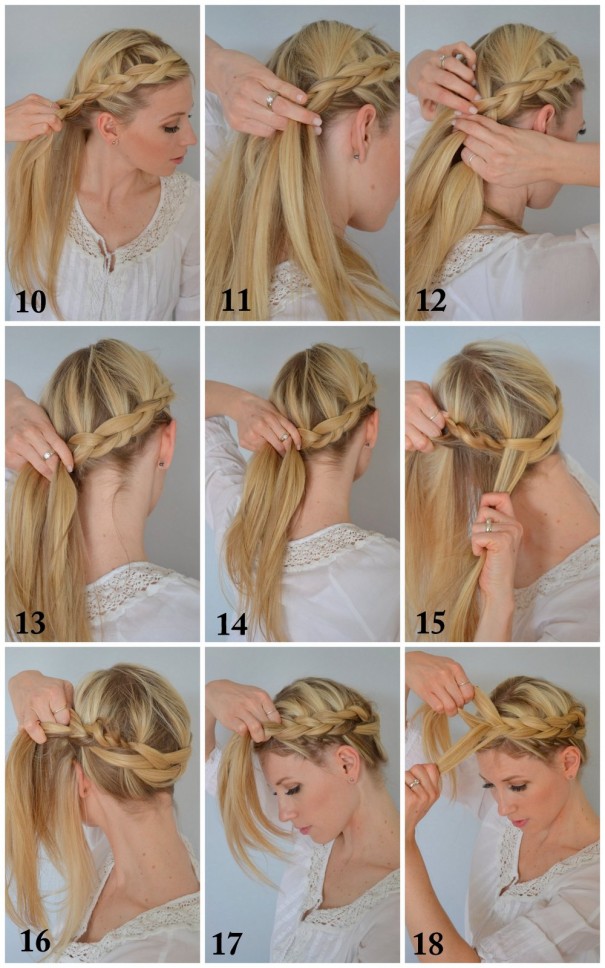
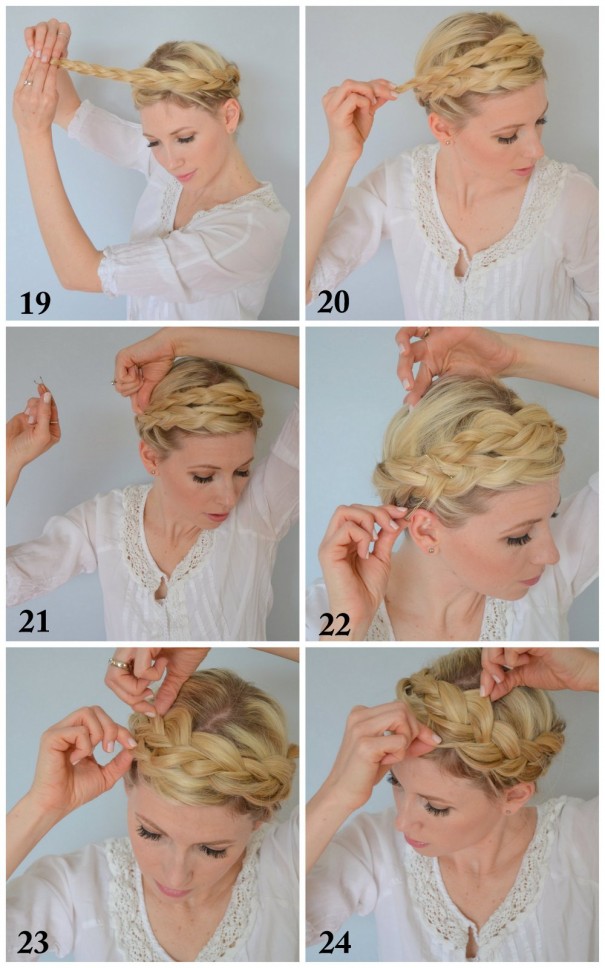
FRENCH BRAID BUN HAIR TUTORIAL

Today we have the second installment of our braid how-to series from Jesse Chamberlin, Alison Brislin, and Kelly Shew. This is a great variation of the french braid bun tutorial we posted last month. Alison suggested adorning your braided bun with sparkly pins, clips, or flowers to add a little special something to the look. Be sure to keep checking back as we have 2 more lovely tutorials coming to the blog later this month. Thanks for another wonderful tutorial, ladies!

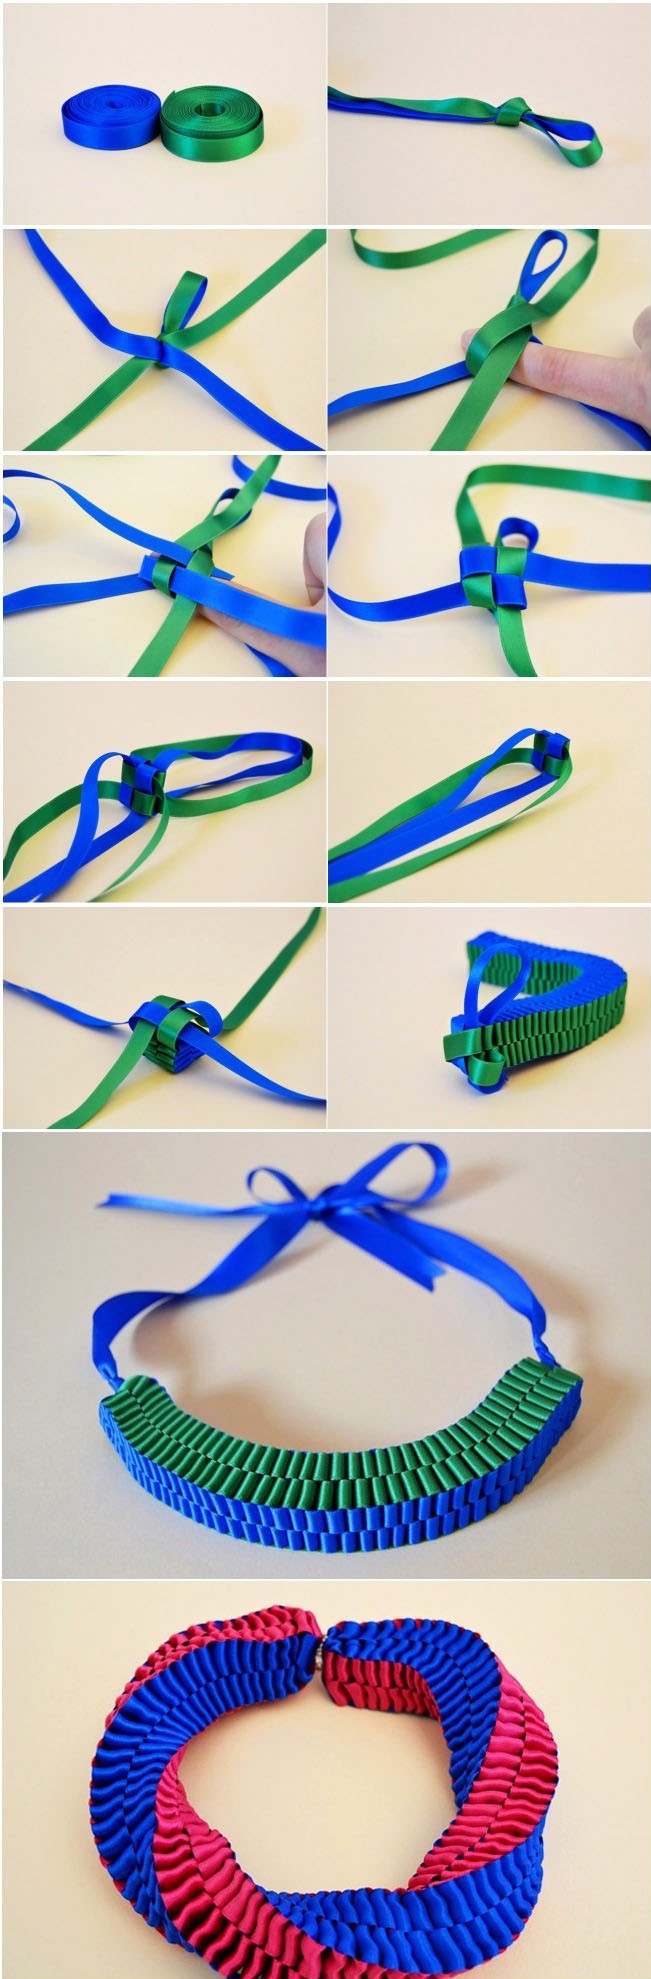
Weding Updos for Long Hair Instructions
1. Part hair.
2. Grab a small section of hair.
3. & 4. Split into 3 parts.
5. Start French braiding, making sure to braid diagonally across the head.
6. Secure braid with a hair tie.
7. Roll the braid up and in, making a little bun.
8.Secure bun next to or above ear with Bobbi pins.
*Adorn braided bun with sparkly pins, clips, flowers, or whatever your heart desires.
Extra Tips
- You should brush your hair before braiding. Knots and tangles make it hard for the person braiding your hair. Might also hurt a little bit!
- Part on your natural side. Adjust instructions according to your part.
- Day old hair is best. A little grit is good for braids as they hold-up better. Clean hair is too slippery.
- These tutorials are written for someone to braid your hair, not intended for self-braiders. Unless you are really clever and talented!
Friday, September 13, 2013


Sunday, September 8, 2013
Get Fuller Brows With These Tips

Model Arizona Muse has brows to die for.
Photo: Luca Cannonieri/GoRunway.com
Photo: Luca Cannonieri/GoRunway.com
For most of us, big, bold brows are but a dream. Whether it’s genetics or too much tweezing in the past, our wimpy little arches could use a boost. Thankfully, in this day and age we have tons of options for getting fuller-looking eyebrows.
Di Medlock, the director of waxing at Exhale Spa isn’t new to the issue of sparse brows. “If a guest expresses and interest in growing their brows back, I put them on ‘the system,’” says Medlock. “It’s important to see what your brows are capable of producing without outside assistance. We allow the brows to grow with no tweezing, waxing or threading for four weeks. This will show me how much natural growth is possible, trouble spots and the willpower of my guest.”
If after four weeks you’re still seeing skinny eyebrows, these methods will help make them look beefed up:
Brow Pencil/Gel
When it comes to faking big brows, Medlock says drawing them in is the most realistic looking approach. “For results you can see right away, go for a daily dose of brow pencil, shadow or gel, ” says Medlock. “All can create the look of fuller, thicker brows instantly with no commitment.” Watch this video to learn how to fill in brows the easy way.
When it comes to faking big brows, Medlock says drawing them in is the most realistic looking approach. “For results you can see right away, go for a daily dose of brow pencil, shadow or gel, ” says Medlock. “All can create the look of fuller, thicker brows instantly with no commitment.” Watch this video to learn how to fill in brows the easy way.
Brow Extensions
Completely Bare hair removal spas in New York now offer brow extensions (it’s like weave for the face!). Brow specialists dye real human hair to match it to yours, and then attach the hairs to your own eyebrows. They cost $185 and last about two weeks.
Completely Bare hair removal spas in New York now offer brow extensions (it’s like weave for the face!). Brow specialists dye real human hair to match it to yours, and then attach the hairs to your own eyebrows. They cost $185 and last about two weeks.
Brow Serums
If you don’t want to fake it any longer, Medlock has suggestions for serums that can help regrow wimpy brows. “Castor oil is a tried and true Italian grandma trick,” says Medlock. “Apply to any and all areas where you would like to see thick, longer hair.” For over-the-counter serums, she suggests Revitabrow ($110, nordstrom.com), which is Exhale’s preferred product. “It feeds the follicle to produce thicker, fuller hairs and encourages root growth from dormant follicles.” For prescription products, Medlock likes Latisse. “It’s the most powerful lash conditioner on the market, and the great news for us is that it works on the brows too.”
If you don’t want to fake it any longer, Medlock has suggestions for serums that can help regrow wimpy brows. “Castor oil is a tried and true Italian grandma trick,” says Medlock. “Apply to any and all areas where you would like to see thick, longer hair.” For over-the-counter serums, she suggests Revitabrow ($110, nordstrom.com), which is Exhale’s preferred product. “It feeds the follicle to produce thicker, fuller hairs and encourages root growth from dormant follicles.” For prescription products, Medlock likes Latisse. “It’s the most powerful lash conditioner on the market, and the great news for us is that it works on the brows too.”
The Secret to Getting a Great Top Knot


Models wore top knots at the Kate Spade Spring 2014 Presentation.
Top knots are our favorite go-to hairstyle on days when we don’t have time to go the heated styling route. The style is also helpful when you want to hide the fact that you haven’t washed your hair in, oh, a week. Backstage at Kate Spade‘s Spring 2014 presentation, models were getting the top knot treatment from Garnier stylist Tommy Buckett, who shared his secrets for getting it just right.
To get the perfect texture, Buckett raked Garnier Fructis Surfer Hair Power Putty ($6.09, soap.com) through the whole hairline. Next he gathered the hair up high on top of the the head. “We didn’t want it too ballerina looking,” he said. “We wanted it to be a little more chic.” Since the key to a great top knot is getting the hair up high, Buckett had two great suggestions:
1. Flip your hair upside down when gathering hair into the ponytail. This will help you to get it as high as possible.
2. Once you’ve gathered the hair, flip upright and look up to the ceiling, so your head is tilted, which will make smoothing the hair into place that much easier.
Once your ponytail is secured, wrap the hair around the base and secure with four to five large bobby pins. The result? A fuss-free hairstyle that will stay in place all day.
The Ultimate Travel Beauty Packing List
If you’re like us, then you spend hours packing only to arrive at your destination to see that you forgot the one beauty item you can’t live without. Never forget another beauty necessity again with this packing list. Print it out before your next big trip, or stick it next to your mirror, so you never forget to layer on your serum before your moisturizer again.


Jennifer Aniston’s Natural Makeup: Get Her We’re The Millers Premiere Look


Jennifer Aniston at the premiere of We’re The Millers.
Photo: Getty Images
Photo: Getty Images
Nobody does natural makeup quite like Jennifer Aniston. True to form, Jen showed up at last night’s premiere of her new film, We’re The Millers, sporting her signature fresh, flawless face. Her secret? Angela Levin, the Chanel celebrity makeup artist who’s been behind the actress’s most gorgeous looks. Here’s how Levin prepped Jen for the red carpet — we’ll be taking notes.
Skin
“I started by prepping the skin with Aveeno Positively Radiant Daily Moisturizer [$16.99, aveeno.com]. I used my fingers to massage the cream into the skin, face and neck. I wanted an oil-free cream that hydrates and is lightweight; this moisturizer is a perfect choice! I then dabbed Aveeno Smart Essentials Anti Fatigue Eye Treatment [$11.99] under the eyes using my fingers.”
“I started by prepping the skin with Aveeno Positively Radiant Daily Moisturizer [$16.99, aveeno.com]. I used my fingers to massage the cream into the skin, face and neck. I wanted an oil-free cream that hydrates and is lightweight; this moisturizer is a perfect choice! I then dabbed Aveeno Smart Essentials Anti Fatigue Eye Treatment [$11.99] under the eyes using my fingers.”
Foundation
“My next step was a primer to maintain longevity of the makeup. I used Youngblood Mineral Primer [$41,ybskin.com] with a sponge. For foundation, I applied Face Stockholm Picture Perfect Foundation [$48,blush.com] in “O” and “J“ with a Chanel Foundation Brush #6 [$45, nordstrom.com], blending the foundation into the skin using a circular motion. Jen already has a gorgeous complexion, so a small amount was all that was needed for the cameras.”
“My next step was a primer to maintain longevity of the makeup. I used Youngblood Mineral Primer [$41,ybskin.com] with a sponge. For foundation, I applied Face Stockholm Picture Perfect Foundation [$48,blush.com] in “O” and “J“ with a Chanel Foundation Brush #6 [$45, nordstrom.com], blending the foundation into the skin using a circular motion. Jen already has a gorgeous complexion, so a small amount was all that was needed for the cameras.”
Blush
“With a small round brush I applied Chanel Le Blush Crème in Revelation [$38, chanel.com]. It’s the perfect sun-kissed color! I then used a translucent powder to set the cream blush. With Chanel Les Beiges Healthy Glow Sheer Colour SPF 15 in No. 40 [$57.50] I bronzed the forehead, cheeks, chin and nose giving that bronzed look we all love so much! I love this new product from Chanel, because it’s matte and transparent, letting the skin come through, and the brush it comes with is truly a great one!”
“With a small round brush I applied Chanel Le Blush Crème in Revelation [$38, chanel.com]. It’s the perfect sun-kissed color! I then used a translucent powder to set the cream blush. With Chanel Les Beiges Healthy Glow Sheer Colour SPF 15 in No. 40 [$57.50] I bronzed the forehead, cheeks, chin and nose giving that bronzed look we all love so much! I love this new product from Chanel, because it’s matte and transparent, letting the skin come through, and the brush it comes with is truly a great one!”
Eye Shadow
“I primed the eye area from lid to eye brow with Edward Bess Illuminating Eye Shadow Base [$30,sephora.com], and for the eye shadow look I used all shades from the Chanel Quadra Eye Shadow in Spices[$59]. The lightest color was applied under the brow to create a lift, with the gold color on the lid and under lower lashes to brighten up the eyes. Next, the dark mauve shade was used in the crease in a half moon shape where the darkest area is placed in the center above the eyeball. This helps to give a round, open look to the eyes. Lastly, with Chanel Illusion D‘Ombre Long Wear Luminous Eye Shadow in Ebloui [$36], I framed her eyes using it as an eye liner between the upper and lower lashes.”
“I primed the eye area from lid to eye brow with Edward Bess Illuminating Eye Shadow Base [$30,sephora.com], and for the eye shadow look I used all shades from the Chanel Quadra Eye Shadow in Spices[$59]. The lightest color was applied under the brow to create a lift, with the gold color on the lid and under lower lashes to brighten up the eyes. Next, the dark mauve shade was used in the crease in a half moon shape where the darkest area is placed in the center above the eyeball. This helps to give a round, open look to the eyes. Lastly, with Chanel Illusion D‘Ombre Long Wear Luminous Eye Shadow in Ebloui [$36], I framed her eyes using it as an eye liner between the upper and lower lashes.”
Mascara
“Now that I completed all the creams and powders, I focused on the lashes and applied three layers of Chanel Inimitable Intense Mascara in Noir [$30].”
“Now that I completed all the creams and powders, I focused on the lashes and applied three layers of Chanel Inimitable Intense Mascara in Noir [$30].”
Lips
“After lining the lips, I finished the look with Chanel Rouge Allure Extrait De Gloss in Insouciance [$32].”
“After lining the lips, I finished the look with Chanel Rouge Allure Extrait De Gloss in Insouciance [$32].”


Subscribe to:
Posts (Atom)